|
|
|
Bath Tub Puppet
Please give this page a minute to load.Don't forget goodies for the children!
These are simple, fun to make, and sure
to delight the lucky kids who receive them.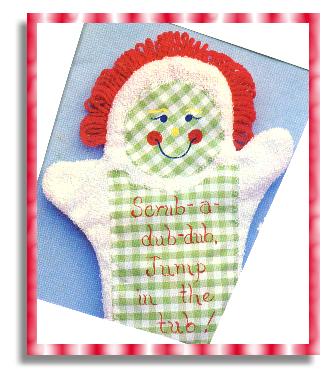
There are 2 Sizes I scan for everybody1A - Finished size: 5" by 10"2A - Finished size:
Materials: 1/3 yard white terry cloth;
1/4 yard gingham;
2 yards washable red yarn;
white thread;
red, blue, and yellow acrylic paints;
stiff cardboard
1. Cut patterns from terry cloth and gingham as directed.
2. Machine zigzag stitch gingham circle and front panel pieces onto front of one terry cloth piece.
3. Wrap yarn around a 6 by 1 1.2-inch piece of cardboard (without stretching) to make a coil of yarn.
4. Gently slide the coil of yarn off the cardboard. Arrange yarn around top curve ("head") of terry cloth front.
5. Place back terry cloth piece over front, right sides together: pin, being careful not to uncoil yarn "hair".
6. Machine stitch around mitt on 1/2-inch seam line, leaving bottom edge open. Be sure to catch yarn in seam.
7. Turn bottom edge up to inside. Zigzag stitch over raw edge: clip corners at "neck";turn right side out.
8. Paint face and verse on panel with acrylic paints. A child's name may be substituted for the word "jump" if desired.
9. When paint has thoroughly dried, press with a vinegar-soaked pressing cloth and a hot iron to set paint for permanence.
1A - Finished size: 5" by 10"Front Panel - Cut 1 gingham on fold
Face - Cut 1 gingham on fold
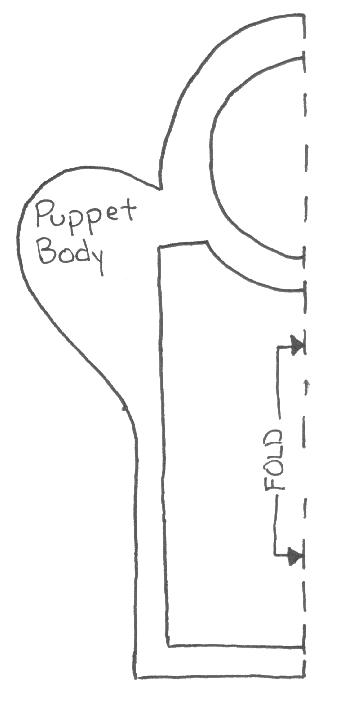 Puppet
Body - On fold, cut 2 entire shapes from white terry
Puppet
Body - On fold, cut 2 entire shapes from white terry
2A - Finished size:
Face - Cut 1 gingham on fold
Front Panel - Cut 1 gingham on fold
Puppet Body - On fold, cut 2 entire shapes from white terry
Puppet Body
HOME